Author Archives: Kat

Will I ever get it done….?

Standard

A close friend of mine has just found out that her husband has cancer. At the very least, he will be spending the next 12 months going through chemo, radiotherapy, and surgeries. Or else he will be classed as being for palliative care only, which may be the case in the end anyway.

I am in another state to my friend and her family, so I can’t be there to babysit the kids during doctor’s visits or hospital stays, or supply casseroles and such so they don’t have to think about cooking when they least feel like it, so I have to be creative in showing my support and love.

So I have decided that it would be really nice to make a “memory quilt”, so that my friend’s hubby has got something to take with him to hospital that will keep his family nearby, so to speak. I have gone through and downloaded some of the photos from my friend’s facebook acount, and I plan to use them in the quilt (in an iron-on format), along with fabric that has some sort of meaning – prints to remind him of his wife, his kids, his pets, and his favourite things.

But I rarely manage to finish all these great projects that I have planned. Life just seems to get in the way, and when I have the time, I find I forget all about these big plans, and I fluff around doing nothing much apart from time wasting. This is one project that I really want to complete…and I’d even like to take things further and do cuddle rugs for the kids, and a quilt for my friend, so they have something similar to remind them of their Dad/husband when he’s in hospital….or worse.

But will my desire to do this project ever be enough to motivate me to get it done?

Fingers crossed!!

Knickers In A Twist

Standard

Jalie Knickers

“Mum, I’ve run out of knickers again!”, has been the catch cry of my daughter over the last few months. How can a drawer full of knickers simply disappear into nowhere? She tells me that she put them in the wash, but a frantic search (it’s always right before we have to go out that she discovers the absence of said knickers) reveals no knickers in the laundry basket, tumble dryer, washing machine, or on the clothes line. A “mother’s” look reveals cast off knickers under my daughter’s bed, under a pile of other dirty clothes in her room, on the floor of the bathroom, and just generally scattered everywhere but “the wash”.

I decided it was time to fix this situation by making my daughter some more knickers. I had done this previously in the past, using the bottom half of a leotard pattern, which was passable to use in  a pinch, but not quite right for an everyday pair of knickers. But then I discovered two things that have really made my knickers a dream to make and wear – Jalie patterns, and fold-over elastic!

Jalie make the majority of their patterns in a huge range of sizes, from toddler to larger adult, all in one pattern. So I could make my daughter and myself some knickers using just the one pattern.

Fold-over elastic is exactly what the name implies – elastic that has a crease down the centre and can be folded over the raw edge of almost anything to create a professionaly finish. I have used it on t-shirt necklines, knickers, the neck and armholes of dresses, and sleeve cuffs. It can be stretched and used in place of elastic or ribbing, or used just barely stretched to replace bias binding or turned up edges. Very versatile!

Anyway, I dragged out my Jalie patterns, and decided on Jalie 2568 in the low cut bikini style. Compared to the Jalie 2564 bikini, this bikini pattern is very slightly lower cut across “the cheeks” without being a hipster. But even that small difference means the knickers don’t ride up where they aren’t wanted!! The Jalie 2564 makes provisions for using fold-over elastic though, where the Jalie 2568 does not. So I had to trim away a quarter of an inch from the leg openings where the fabric would normally be folded over to encase standard elastic. The other alteration I make to this pattern is to extend the crotch lining by an inch or so, as it just seems too short for my liking.

The fold-over elastic just gets folded over the raw edge, stretched to fit the opening, and stitched with a small zig-zag stitch. It can also be attached in two steps, stitching the back on first, and then folding it to the front and stitching again. I like to overlock the raw edge of the fabric I will be attaching the elastic to first, because then I know that if my fold-over elastic covers the overlocking, then it is secured firmly to the fabric and hasn’t slipped out of position towards the edge of the fabric.

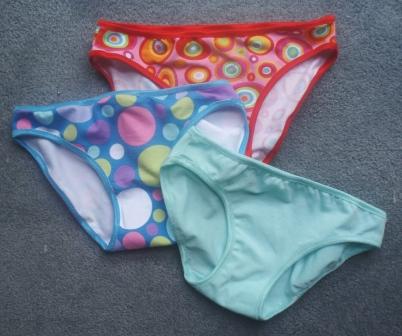
After very little time, I had produced three more pairs of knickers for my daughter. I used cotton lycra fabric, the mint green from SewBaby, and the patterned fabric from Spotlight Australia. The fold-over elastic came from various online stores, including Sew Sassy Fabrics, Fabric Hound, and sellers on Etsy.

Jalie Knickers

The three pairs of knickers I made for my daughter

I just love making such quick and easy items. The almost instant gratification keeps me motivated through to the finish, and knickers tend not to flounder in my UFO (unfinished object) pile for long, if at all.

So now I shouldn’t hear so much of the “I can’t find any knickers” cries. Too right!! The excitement of new knickers has resulted in them being put in the wash quick smart, so they can be worn again soon. So I began to relax once more, confident that my daughter would have all the items she needs in order to start the day. Until my morning cup of tea was interrupted with my daughter in full voice….

“Mum, I can’t find any socks!!”

Patchwork Bag – Part Two

Standard

Okay, so at this point in time, you should have two plaited straps, a lining for the bag, and a patchwork “outer” part for the bag. Both the lining and the outer bag are still flat at this stage, but now have to be sewn into “tubes”. This is where things feel “wrong” when handling the bag. Nothing sits flat, and the fabric feels all twisted as you are trying to sew. This is normal. If you look at the lining in a completed bag, the seam actually travels around the inside of the bag in almost a spiral from top to bottom. Hence the “twisted” feeling when trying to match up the appropriate seams.

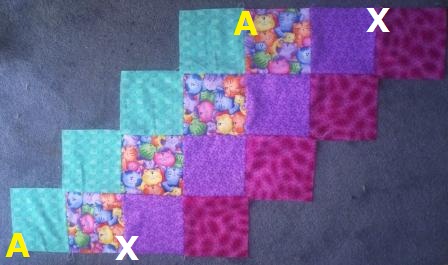
On the photo below, I have labelled the seams that need to be matched up. Basically, the two edges (the labelled ones) get stitched together in a manner that carries on the staggered format of the patchwork strips.

Cat Bag Outer Layer, Labelled

The edges need to be lined up, right sides together, so that the corresponding letters match up.

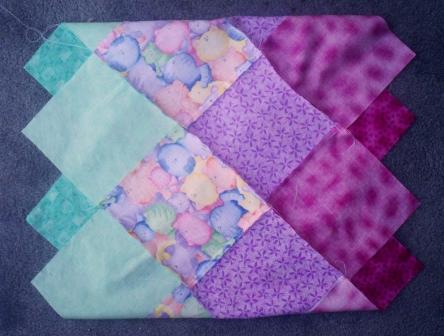
If you mark the bag in the places that correspond to the letters above, and then match each mark to it’s partner (A to A, X to X) and sew, you should end up with a tube as follows…..

Cat Bag Tube

The seam that you have just stitched will now be running at an angle from top to bottom, which is why it feels so awkward to pin and sew.

You now need to do the same with the lining, but you don’t have the seams to help line things up, hence the reason for marking where the seams would be. Use these markings to help match things up and stitch in the same manner as the outer bag.

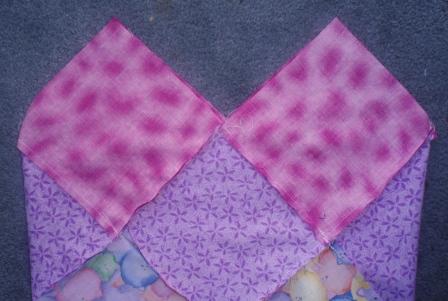
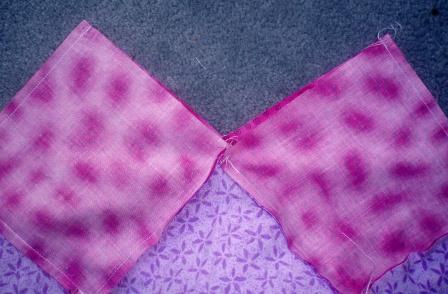
Now to begin creating the base. Line up the points on the bottom of the bag as shown below. Stitch the outer edges, from crease to point. Do the same with the lining. The first photo shows the base, with points matched up, and the second photo shows where the base has been stitched.

Cat Bag Base Before Stitching

The base before stitching, with points matched up.

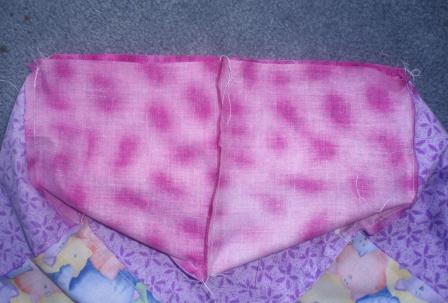
Cat Bag Base After Stitching

The base once the first edges have been stitched. The two corners (one on top of the other) in the centre of the picture will end up being pulled apart from one another so that they are at either end of a straight edge.

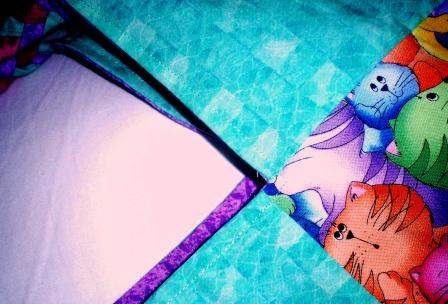
Now the base needs to be prepared for the next row of stitching. Find the corner that corresponds to the one in the centre of the picture above. It will be two layers of fabric on top of one another. Grab each layer of fabric at the corner and pull apart from each other (as if you were opening a sealed bag full of crisps or similar). This will bring the seams you have just stitched into line with each other. Now you should have a straight edge to sew, as in the photo below.

Cat Bag Base Step 2

The second part of stitching the base. The seam down the centre of the photo is one of the first two base seams that were stitched in the step above this one.

DO NOT do the above step with the lining, or you will not be able to turn the bag in the right way later! Only the first seams of the lining base get stitched for now.

Turn the outer part of the bag, and the lining, so that one if the right way out, and the other the wrong way out. Place on inside the other so that right sides are together. Match the corners of the bag and lining that you pinned/marked previously.

Inserting the lining

Matching up the points of the lining with the outer bag.

Ensuring the handles aren’t twisted, insert them between the lining and the bag layers, with the ends at each corner. The two ends of one handle should be in adjacent corners, not opposite ones. Pin everything in place and stitch.

Placing the Handle

Placing the handle of the bag, between the lining and the outer bag. Ensure the handle isn't twisted.

When stitching the outer corners, stitch across them rather than in a point. Stitch back and forth across each corner a couple of times to ensure the handles are secure and will take the weight of the bag contents without the stitching pulling undone.

Cat Bag Securing Lining to Bag

The stitching around the top of the bag - this part is where one of the handles sits.

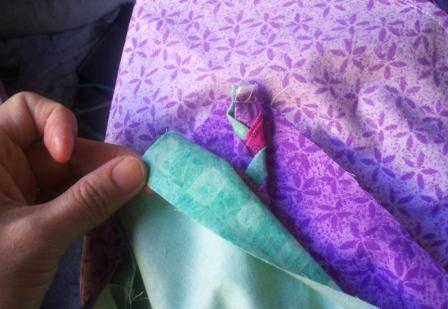
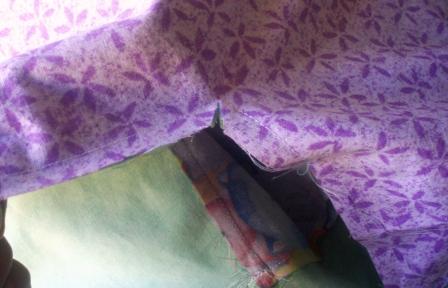
Clip the inner corners as shown.

Clipping Corners

The corners need to be clipped, to allow the bag to sit nicely once turned in the right way.

Now you can turn the bag in the right way through the hole left in the lining base. Check that the handles are securely caught up in the stitching before closing the gap in the lining. I like to turn the edges of the gap to the inside and machine stitch it closed as shown below, but hand stitching will provide a neater finish.

Stitching Lining Closed

The lining where it has been stitched closed after turning the bag in the right way. I do this stitching on the machine, but it can be handstitched for a more invisible finish.

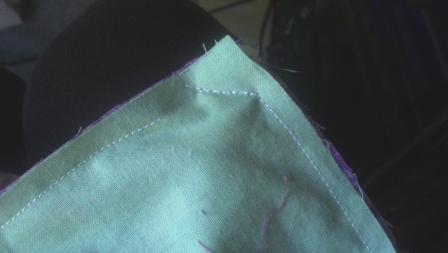
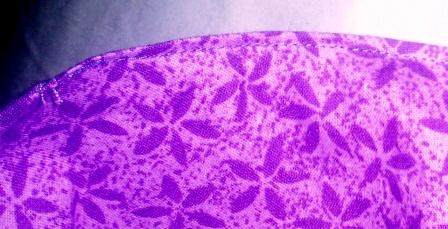
At this stage, I like to topstitch around the top edge of the bag. It keeps things sitting nicely, especially in the corners, and is just one more layer of stitching to help hold the handles in place securely.

Topstitching

The top edge of the bag, showing the topstitching. Not a good photo I'm afraid.

Now you should have a finished bag. Congratulations!!

Finished Bag

The final product.

I hope to write another post soon, showing some variations, such as pockets, a bag in which the lining is not done separately, and a lining option which makes better use of fabric than the method explained here.

Happy sewing!

Patchwork Bag – Part One

Standard

I was given a bag like this by a good friend, and I fell in love with it. It is nice and deep, and has a square base rather than being rectangular. I used the bag for many purposes and decided to try and make more. But when I examined it cloesly, to work out how it was constructed, I ended up with my brain in a twist! I have since been taught the ins and outs of how this great looking bag goes together, and it’s much easier than it looks. Now I am a “pro” at whipping one up, and I have begun adding all sorts of variations to the basic design, just to make them unique and interesting.

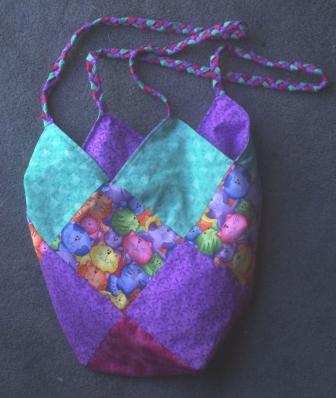
One of the bags I have made - this one was for my daughter

The bag consists of 16 squares of equal size, which can be cut from all different fabrics, or four co-ordinating fabrics, or even pieced together in quilting-style designs. I usually make plaited fabric handles, as they give a nice finish to the bag. The bag is lined, so this needs to be considered when buying fabric. So far, I have either made bags using fabric I have in my stash, or I have bought fabric and just cut the squares to a size that suits the amount of fabric I have bought. I have used old sheets, or stash fabric as lining. As a result, I cannot really give an idea of how much fabric to buy, though I guess it can be easily worked out once you have chosen a size.

Size-wise, you can determine the end size of a bag using a cutting mat. Pick a square size that you think you might want to use, and mark out one that is 1/2″ smaller (to allow for seams). Measure across it diagonally. A square with sides this length will be the size of the bag’s base. Multiply the measurement by 1.5 to get the bag depth. You can do this in reverse if you want to know what size squares to use to make a specific size bag.

Once you have picked your fabrics and worked out what size squares to use, then you can start cutting. A rotary cutter, quilter’s ruler, and cutting mat will make this job much faster and easier.

As I said before, you will need 16 squares. You will also need strips for the straps – for plaited straps, cut 6 strips, each one being 1.5″ wide and about a yard long (I cut from selvage to selvage). The lining is cut out later.

The squares and strips, cut out and ready to sew

Once you have got your squares and strips, then you can start sewing. I use a 1/4″ (6mm) seam, but you can vary this if desired (keeping in mind that all my measurements have been calculated with a 1/4″ seam in mind). Begin by sewing 4 squares together into a strip, and repeat this until you have 4 strips consisting of 4 squares each (see pictures). When deciding how to arrange your different fabrics, keep in mind the layout shown here. The ends of the strips (which are the pink and the green squares here) will be the top and bottom of the bag, which are still interchangeable at this point. If you are using just four fabrics, then simply sew the squares together in four identical strips as shown here. Keep in mind that the base of the bag will tend to get dirty quickly, so try to put the darkest fabric on the bottom.
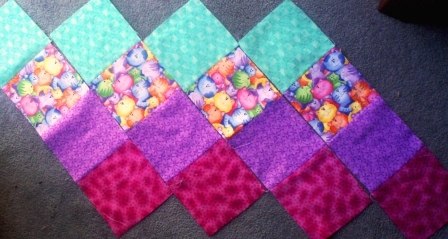
Cat Bag 02

The four strips of squares that make up the bag. They are laid out in the way they will be sewn together to make the bag.

Before sewing the strips together, it helps to press the seams flat. I press them in alternating directions, so they don’t become too bulky when sewn together, and to help the seams butt up against each other as they get stitched.
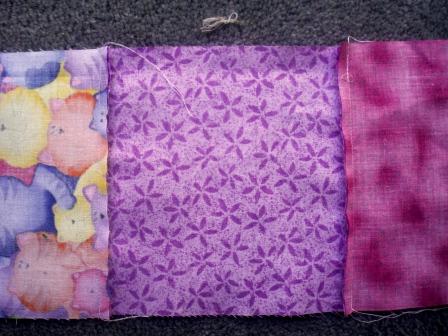
Cat Bag Strip Seams

This shows the seams pressed in alternating directions. Each strip's seams get pressed in an identical manner to the others strips.

The four strips then get sewn together in a staggered fashion, as shown, with seams lined up with one another. Don’t worry that the ends of the strips don’t line up with a seam – they are not supposed to. Focus on getting the seams lined up with one another instead. Press once complete.
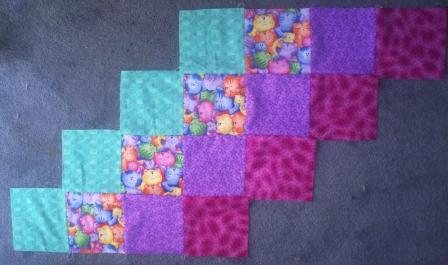
Cat Bag Outer Layer

The outside of the bag, formed by sewing the strips to one another in a staqggered fashion.

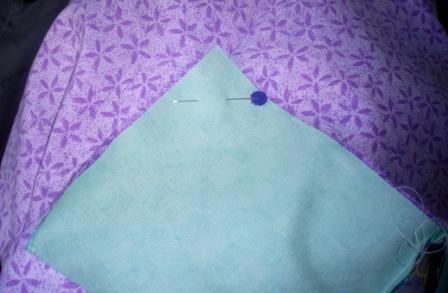
Now lay the “outer bag” onto your lining fabric with right sides together. Using the outer bag as a template, cut the lining out carefully to match. Before separating the bag and lining, mark one of the TOP squares of the bag with a safety pin (refer to picture above to help work out which your top squares will be – mine are the green ones), and do the same with the corresponding part of the lining. This helps with a better fit when putting the two together. Also, place marks along the straight edges of the lining to correspond to where the seams are on the outer bag.
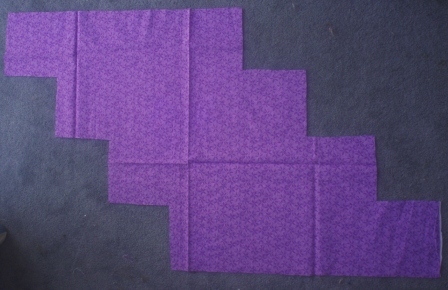
Cat Bag Lining

The lining after being cut out. This should be indentical in size to your outer bag. (I probably should have ironed the lining fabric before cutting!)

Now this is where the construction gets complicated to explain, so we will put the lining and bag aside for a moment, and work on the handles….

The strips for the handles need to be folded in half lengthways, with right sides together, and stitched as shown above (it is partly unfolded in the photo, just to show how it gets folded before stitching). The strips all then need to be turned in the right way, ready for plaiting. Secure three strips together at one end, then plait them before securing the other end to create one bag handle. Repeat for the second handle.
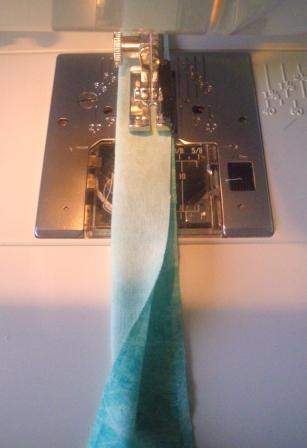
Cat Bag 03

One of the strips for the handle being stitched.
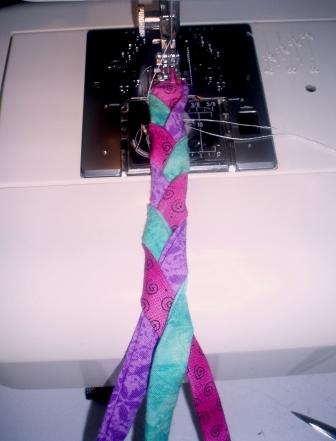
Cat Bag Handle

Plaiting the handle. I use the presser foot on my machine to hold the end steady while I plait.

With the handles done, it is time to return to the main part of the bag. This will be explained in Patchwork Bag – Part Two, as this post is already too long 🙂

I hope I have explained things okay so far. Feel free to contact me with any questions.

Happy sewing!

The War Zone

Standard

As I said in the “About” section, I have a sort of love-hate relationship with my sewing. I really enjoy the creative side of it. The search for fabric and patterns is great fun, but usually only if I have nothing specific in mind. When I spy a pattern or fabric that I love, then the ideas flow like a downpour, fast and intense. If I am looking for something more specific, then it becomes less satisfying. The drive from fabric shop to fabric shop in search of that elusive pattern or fabric just drives me bonkers, and it’s even worse if I have to find BOTH a specific fabric AND a specific pattern. Spontaneous buying works best for me – but it does result in a rather large stash of impulsively bought sewing supplies that I “will get around to using one day”.

Yesterday was a prime example. I was looking for some angel fabric so I could make a bag for a friend who loves angels. But the fabrics with angels on were all Christmas ones, and I wanted a fabric that would be suitable year-round. So I went for a wander through the quilting fabrics, just to see what else there was. I spied a cat print fabric, and thought that was suitable, as the same friend loves cats, as do my daughter and I, so the fabric wouldn’t be wasted if I got more than what I needed. On the prowl for some fabric that I could match it to, I found some more cat fabric in the same range….and some more…..and some more….

I ended up with over ten metres of various cat print fabrics, plus a few other fabrics that took my fancy. And now I don’t want to use them for my friend’s bag, because I have a quilt for my daughter in mind instead. So I am back to square one. And I STILL didn’t get the red fabric or the interfacing that were the reason I was in the shop to start with!

Now let’s return to my love-hate relationship with sewing, and explore another reason why it occurs – My Sewing Room, aka The Disaster Zone!

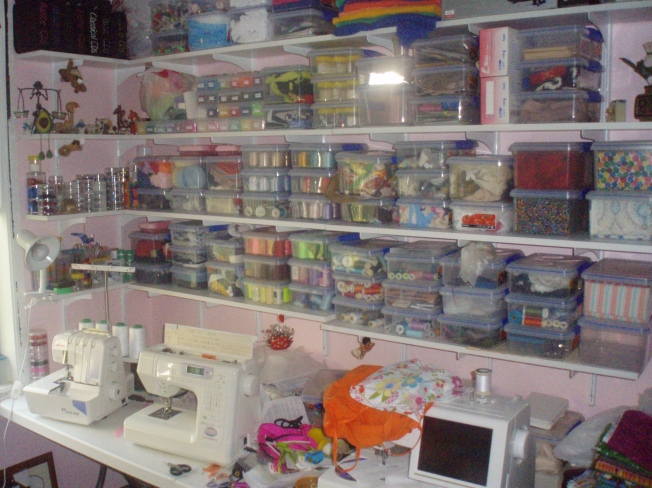
I have always had a problem with keeping things tidy, and this has certainly been so with my sewing room. So one year, when I had earned some extra money by making a heap of dance costumes for non-sewing dance mums, I decided that the best way to spend the proceeds was to organise my sewing room. I bought some adjustable shelves, and boxes for all my goodies. I wanted to build in a desk too, but money didn’t extend that far, and neither did my know-how! So here’s the result….

My Sewing Room

As you can see, it kept many things tidy and organised. I could have a box for just about everything, the boxes stack, so make the most of the available space, and being see through helps me lay my hands on whatever I need with relative ease. So what is the problem, you might well ask? Just look down….

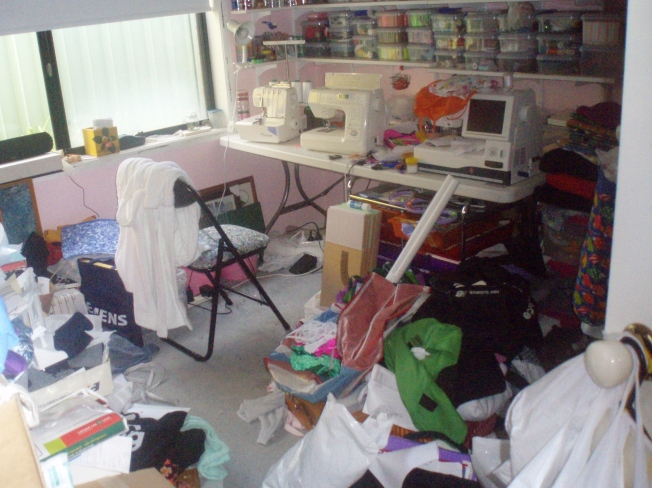
The War Zone

And that’s the best view! The mess takes up most of the floor and spills out of the door. I seem to have run out of space to put all my beloved craft supplies. The resulting piles of “stuff” just keep on growing, and help to create an environment that just adds to my sewing displeasure. Which leads into the number one reason why sewing and I just do not get along as much as I’d like to – PROCRASTINATION.

I have a plethora of UFOs (that’s “unfinished objects” to the uninitiated). They build up and create a feeling of despair whenever I cast my eyes around the room. But try as I might to turn over a new leaf and finish one project before starting another, the constant barrage of ideas in my brain eventually ends up being too difficult to ignore and the boring “old” project is cast aside to make room for a “new” one which, in all probability, is also destined for the label of “UFO”.

Hence this blog. I am hoping, against all odds, that writing about my projects just might give me the incentive to see a few more through to completion. And maybe, just maybe, I might make some inroads into “The Stash” faster than I can add to it!

Scattered Sewing….

Standard

This blog is dedicated to my on and off sewing projects. They are often somewhat disorganised, and many will sit half finished for weeks, months, or even years, before I finally pick them up again.

I am hoping that blogging about my projects might give me an incentive to work through that roadblock I often encouter when working on a project, so that I complete more sewing and begin to make a dent in my obsessively collected pile of fabric and habadashery!!

I hope that you can find some use in what I write, as I plan to catalogue my projects in such a way that others can learn from them. I have been greatly helped by other bloggers in the past, and this is a way to pay the favour forward.

Happy sewing!!